22 minute read · May 10, 2024
Ingesting Data into Nessie & Apache Iceberg with kafka-connect and querying it with Dremio
· Senior Tech Evangelist, Dremio
Github Repository for this Hands-On Exercise
The ability to stream and process data in real-time is invaluable for businesses looking to gain timely insights and maintain a competitive edge. Apache Kafka, a robust event streaming platform, and Kafka Connect, its tool for integrating external data sources and systems, are popular pillars of streaming platforms. They allow organizations to capture, distribute, and manage continuous data flows efficiently. Complementing this setup, Apache Iceberg offers an innovative table format that supports large-scale analytic datasets in a data lakehouse by providing functionalities like schema evolution and time travel. The Iceberg connector for Kafka Connect bridges these technologies, enabling seamless ingestion of streaming data into Iceberg tables. This integration not only harnesses the strengths of Kafka and Iceberg but also maximizes the value extracted from the data lakehouse, ensuring that businesses can respond more swiftly and accurately to changing data landscapes.
The Exercise Setup
In this article, we will guide you through a hands-on exercise that you can perform on your laptop using Docker. This will help you witness the power of the concept in action. The first step involves forking and cloning a GitHub repository to your local environment. We will also discuss the structure of the environment that we're setting up, as outlined in the `docker-compose.yml` file.
version: '3.7'

services:
  zookeeper:
    image: confluentinc/cp-zookeeper:latest
    container_name: zookeeper
    environment:
      ZOOKEEPER_CLIENT_PORT: 2181
      ZOOKEEPER_TICK_TIME: 2000
    networks:
      - dremio-kafka-connect


  kafka:
    image: confluentinc/cp-kafka:latest
    container_name: kafka
    depends_on:
      - zookeeper
    ports:
      - "9092:9092"
      - "29092:29092"
    environment:
      KAFKA_BROKER_ID: 1
      KAFKA_ZOOKEEPER_CONNECT: zookeeper:2181
      KAFKA_LISTENER_SECURITY_PROTOCOL_MAP: PLAINTEXT:PLAINTEXT,PLAINTEXT_HOST:PLAINTEXT
      KAFKA_ADVERTISED_LISTENERS: PLAINTEXT://kafka:29092,PLAINTEXT_HOST://kafka:9092
      KAFKA_LISTENERS: PLAINTEXT://0.0.0.0:29092,PLAINTEXT_HOST://0.0.0.0:9092
      KAFKA_OFFSETS_TOPIC_REPLICATION_FACTOR: 1
      KAFKA_TRANSACTION_STATE_LOG_MIN_ISR: 1
      KAFKA_TRANSACTION_STATE_LOG_REPLICATION_FACTOR: 1
    networks:
      - dremio-kafka-connect

  kafka-connect:
    build:
      context: .
      dockerfile: dockerfile
    container_name: kafka-connect
    depends_on:
      - kafka
    ports:
      - "8083:8083"
    environment:
      CONNECT_BOOTSTRAP_SERVERS: kafka:29092
      CONNECT_REST_ADVERTISED_HOST_NAME: kafka-connect
      CONNECT_REST_PORT: 8083
      CONNECT_GROUP_ID: kafka-connect-group
      CONNECT_CONFIG_STORAGE_TOPIC: kafka-connect-configs
      CONNECT_OFFSET_STORAGE_TOPIC: kafka-connect-offsets
      CONNECT_STATUS_STORAGE_TOPIC: kafka-connect-status
      CONNECT_KEY_CONVERTER: org.apache.kafka.connect.json.JsonConverter
      CONNECT_VALUE_CONVERTER: org.apache.kafka.connect.json.JsonConverter
      CONNECT_KEY_CONVERTER_SCHEMAS_ENABLE: "false"
      CONNECT_VALUE_CONVERTER_SCHEMAS_ENABLE: "false"
      CONNECT_PLUGINS_DIR: /usr/share/java
    networks:
      - dremio-kafka-connect

  kafka-rest-proxy:
    image: confluentinc/cp-kafka-rest:latest
    container_name: kafka-rest-proxy
    depends_on:
      - kafka
      - zookeeper
    ports:
      - "8082:8082"
    environment:
      KAFKA_REST_HOST_NAME: kafka-rest-proxy
      KAFKA_REST_BOOTSTRAP_SERVERS: PLAINTEXT://kafka:29092
      KAFKA_REST_LISTENERS: http://0.0.0.0:8082
      KAFKA_REST_SCHEMA_REGISTRY_URL: 'http://schema-registry:8081'
      KAFKA_LOG4J_LOGGERS: "org.apache.kafka.connect.runtime=DEBUG,io.tabular.iceberg.connect=DEBUG"
      KAFKA_LOG4J_ROOT_LOGLEVEL: "DEBUG"
      CONNECT_LOG4J_ROOT_LOGLEVEL: "DEBUG"
    networks:
      - dremio-kafka-connect

  nessie:
    image: projectnessie/nessie:latest
    container_name: nessie
    ports:
      - "19120:19120"
    networks:
      - dremio-kafka-connect

  dremio:
    image: dremio/dremio-oss
    container_name: dremio
    ports:
      - 9047:9047
      - 31010:31010
      - 32010:32010
      - 45678:45678
    environment:
      - DREMIO_JAVA_SERVER_EXTRA_OPTS=-Dpaths.dist=file:///opt/dremio/data/dist
    depends_on:
      - nessie
    networks:
      - dremio-kafka-connect
  # Minio Storage Server
  minio:
    image: minio/minio:latest
    container_name: minio
    environment:
      - MINIO_ROOT_USER=admin
      - MINIO_ROOT_PASSWORD=password
      - MINIO_DOMAIN=storage
      - MINIO_REGION_NAME=us-east-1
      - MINIO_REGION=us-east-1
    networks:
      dremio-kafka-connect:
    ports:
      - 9001:9001
      - 9000:9000
    command: ["server", "/data", "--console-address", ":9001"]
    # Minio Setup for creating buckets
  minio-setup:
    image: minio/mc:latest
    container_name: minio-setup
    depends_on:
      - minio
    environment:
      - MINIO_ROOT_USER=admin
      - MINIO_ROOT_PASSWORD=password
    entrypoint: >
      /bin/sh -c "
      echo 'Waiting for MinIO to start...' &&
      /bin/sleep 10 &&
      mc alias set minio http://minio:9000 $$MINIO_ROOT_USER $$MINIO_ROOT_PASSWORD &&
      mc mb minio/warehouse &&
      mc mb minio/lakehouse &&
      echo 'Buckets created and data loaded.'"
    networks:
      dremio-kafka-connect:

networks:
  dremio-kafka-connect:
Our Docker configuration outlines the orchestration of services, including Zookeeper, Kafka, Kafka Connect, Kafka REST Proxy, Nessie, Dremio, and Minio, each configured to work harmoniously in a network named dremio-kafka-connect.
Zookeeper Service
Zookeeper acts as a centralized coordinator for distributed systems like Kafka. In our setup, it is configured with a client port and a tick time, crucial for managing the timing of heartbeats and the coordination process. It is run using the latest Confluent Zookeeper image.
Kafka Service
Kafka, the backbone of our message streaming, relies on Zookeeper for cluster management and is configured to expose internal and external communication ports. It's set up to handle data streams efficiently with environment variables that define broker IDs, connection details, listener configurations, and replication factors for system-critical topics. In our setup, Kafka topics are allowed to be automatically created, which, in many production situations, topics would have to be pre-created before usage.
Kafka Connect Service
Kafka Connect integrates Kafka with external systems like databases or file systems. In this setup, it manages connectors, defines converters for keys and values, and specifies storage topics for configuration, offsets, and statuses. This service is built from a local Dockerfile that copies over the Iceberg Connector and configurations which we will cover later.
Kafka REST Proxy
The REST Proxy provides a convenient HTTP interface to Kafka, making it accessible for web-based interactions. We will use it for feeding data into relevant Kafka topics.
Nessie Service
Nessie offers version control for data lakes, allowing you to manage and maintain multiple versions of your data sets. It operates on its own port within our network, facilitating advanced data management strategies. Nessie will be acting as our Apache Iceberg catalog tracking our tables.
Dremio Service
Dremio, a data lakehouse platform, is known for its robust SQL layer that enables analytics on all your data including data lakes, databases, and data warehouses. This will act as our SQL interface for consuming the data for reporting, dashboards, and data science.
Minio Service
Minio provides S3-compatible storage capabilities, which are crucial for handling large data sets in a scalable manner. All of our data and metadata files will be stored in minio.
Minio Setup Service
To ensure Minio is ready for operation as soon as it starts, a setup container is used to wait for Minio to become operational. Then it executes a series of commands to configure storage buckets, essential for organizing data in the data lake architecture.
Network Configuration
All services are connected through a dedicated Docker network named dremio-kafka-connect, ensuring isolated and secure communication between the components without interference from external networks.
This Docker-compose configuration exemplifies a robust setup for handling complex data workflows. It illustrates how various big data technologies can be integrated to create a cohesive and efficient data processing environment. By leveraging Docker, each component is contained and managed independently yet works together seamlessly, making the system robust and scalable.
Configuring the Kafka Connect Connector
Two things are needed for Kafka Connector to do its job:
- It needs to have the connector available. This is handled in the dockerfile that builds the kafka-connect image and loads the connector in the plugin folder.
- Configurations for the particular work you want your Kafka-Connect cluster to do. Since I’m running in standalone mode I’m able to write these configurations in a properties file which is referenced when the cluster starts up.
## Connector Settings
name=iceberg-sink-connector
connector.class=io.tabular.iceberg.connect.IcebergSinkConnector
tasks.max=2
topics=transactions
iceberg.tables.dynamic-enabled=true
iceberg.tables.route-field=table
iceberg.tables.auto-create-enabled=true

# Catalog Settings
iceberg.catalog.catalog-impl=org.apache.iceberg.nessie.NessieCatalog
iceberg.catalog.uri=http://nessie:19120/api/v1
iceberg.catalog.ref=main
iceberg.catalog.authentication.type=NONE
iceberg.catalog.warehouse=s3a://warehouse
iceberg.catalog.s3.endpoint=http://minio:9000
iceberg.catalog.io-impl=org.apache.iceberg.aws.s3.S3FileIO
iceberg.catalog.client.region=us-east-1
iceberg.catalog.s3.path-style-access=true
iceberg.catalog.s3.access-key-id=admin
iceberg.catalog.s3.secret-access-key=password

## Other Settings
iceberg.control.commitIntervalMs=60000

# Serialization
value.converter.schemas.enable=false
value.converter=org.apache.kafka.connect.json.JsonConverter
key.converter=org.apache.kafka.connect.storage.StringConverter
In a production environment, we would deliver these connector settings via rest call to the kafka-connect connector that would look like.
curl -X POST http://<kafka-connect-url>/connectors \
  -H "Content-Type: application/json" \
  -d '{
        "name": "iceberg-sink-connector",
        "config": {
          "connector.class": "io.tabular.iceberg.connect.IcebergSinkConnector",
          "tasks.max": "2",
          "topics": "transactions",
          "iceberg.tables.dynamic-enabled": "true",
          "iceberg.tables.route-field": "table",
          "iceberg.tables.auto-create-enabled": "true",
          "iceberg.catalog.catalog-impl": "org.apache.iceberg.nessie.NessieCatalog",
          "iceberg.catalog.uri": "http://nessie:19120/api/v1",
          "iceberg.catalog.ref": "main",
          "iceberg.catalog.authentication.type": "NONE",
          "iceberg.catalog.warehouse": "s3a://warehouse",
          "iceberg.catalog.s3.endpoint": "http://minio:9000",
          "iceberg.catalog.io-impl": "org.apache.iceberg.aws.s3.S3FileIO",
          "iceberg.catalog.client.region": "us-east-1",
          "iceberg.catalog.s3.path-style-access": "true",
          "iceberg.catalog.s3.access-key-id": "admin",
          "iceberg.catalog.s3.secret-access-key": "password",
          "iceberg.control.commitIntervalMs": "60000",
          "value.converter.schemas.enable": "false",
          "value.converter": "org.apache.kafka.connect.json.JsonConverter",
          "key.converter": "org.apache.kafka.connect.storage.StringConverter"
        }
      }'
While there are many possible configurations, let’s discuss the configuration in this setup.
Connector Basic Settings
- name: This sets the name of the connector instance, iceberg-sink-connector. Naming each connector instance clearly is useful for identification and management, especially when multiple connectors are in use.
- connector.class: Specifies the Java class that implements the connector, io.tabular.iceberg.connect.IcebergSinkConnector. This class handles the logic for interfacing Kafka with Iceberg.
- tasks.max: Defines the maximum number of tasks that should be created for this connector. Setting it to 2 allows the connector to handle more data in parallel, improving throughput.
- topics: Lists the Kafka topics that this connector will consume data from, specifically the transactions topic in this case.
Dynamic Table Management
- iceberg.tables.dynamic-enabled: Enables the dynamic creation of Iceberg tables based on incoming messages, set to true.
- iceberg.tables.route-field: Configures the connector to use a field named table from the Kafka message to determine the destination Iceberg table. This allows for flexible data routing to multiple tables from a single Kafka topic.
- iceberg.tables.auto-create-enabled: When set to true, this allows the connector to automatically create an Iceberg table if it doesn't exist, based on the schema derived from incoming messages.
Catalog Configuration
- iceberg.catalog.catalog-impl: Specifies the implementation of the Iceberg catalog, here using Nessie with org.apache.iceberg.nessie.NessieCatalog.
- iceberg.catalog.uri: The URI for the Nessie server, indicating where the Nessie catalog API can be accessed, set to http://nessie:19120/api/v1.
- iceberg.catalog.ref: Refers to the Nessie branch (similar to a Git branch) that the connector should interact with, typically the main branch.
- iceberg.catalog.authentication.type: Specifies the authentication type; set to NONE for no authentication.
Storage and Region Settings
- iceberg.catalog.warehouse: The URI of the storage location used by the catalog, in this case, an S3-compatible store managed by Minio (s3a://warehouse).
- iceberg.catalog.s3.endpoint: The endpoint URL for the S3-compatible service, here pointing to the Minio service running locally (http://minio:9000).
- iceberg.catalog.io-impl: Defines the class used for IO operations, set to use Iceberg’s S3 file IO operations.
- iceberg.catalog.client.region: Specifies the AWS region for the S3 client; although using a local Minio server, it is set to us-east-1 for compatibility.
- iceberg.catalog.s3.path-style-access: Enables path-style access for S3 operations; important for compatibility with certain S3 endpoints like Minio.
- iceberg.catalog.s3.access-key-id and iceberg.catalog.s3.secret-access-key: Authentication credentials for accessing the S3 service.
Other Settings
- iceberg.control.commitIntervalMs: Controls how frequently the connector commits data to Iceberg tables, set here to 60,000 milliseconds (1 minute).
Serialization Settings
- value.converter and key.converter: Define how Kafka message keys and values are converted. Here, JSON is used for values, and strings for keys.
- value.converter.schemas.enable: Set to false, indicating that the connector should not expect schema information within the message payloads.
Starting Our Environment
To start our environment, run the following command:
docker compose up -d nessie dremio minio minio-setup kafka zookeeper kafka-rest-proxy
Once our environment is up and running, we can visit minio at localhost:9000 with the username (admin) and password (password) to monitor files in storage.
Next, we will begin adding messages to the “transactions” topic, which is the target for ingestion. Our data in TransactionsData.json looks like:
       {
            "value": {
                "id": 1,
                "table": "credit_memo",
                "invoice_num": 623,
                "date": "2024-06-16",
                "amount": 235.67
            }
        },
        {
            "value": {
                "id": 2,
                "table": "bill",
                "invoice_num": 444,
                "date": "2024-09-03",
                "amount": 946.67
            }
        },
        {
            "value": {
                "id": 3,
                "table": "bill_payment",
                "invoice_num": 299,
                "date": "2024-03-15",
                "amount": 354.77
            }
        },
        {
            "value": {
                "id": 4,
                "table": "invoice",
                "invoice_num": 249,
                "date": "2024-06-15",
                "amount": 479.09
            }
        }
Each table will be written to a table based on the “table” property. Since autoCreate is enabled, kafka-connect will create the Apache Iceberg tables as needed. To send the data to Kafka, make the following REST API call using CURL or your preferred HTTP client (Postman, Insomnia, Thunderclient).
curl -X POST -H "Content-Type: application/vnd.kafka.json.v2+json" \
    -H "Accept: application/vnd.kafka.v2+json" \
    --data-binary "@./TransactionsData.json" \
    http://localhost:8082/topics/transactions
The file has 100 records, so you may want to run this several times before and after we get kafka-connect running to ensure enough data for the connector to write files.
Starting Kafka Connect
Next, we will start kafka-connect with the following command:
docker compose up --build kafka-connect
This will build the kafka-connect image with the Iceberg connector and our configurations and start up the process, which will begin reading from the running Kafka instance and ingesting data.
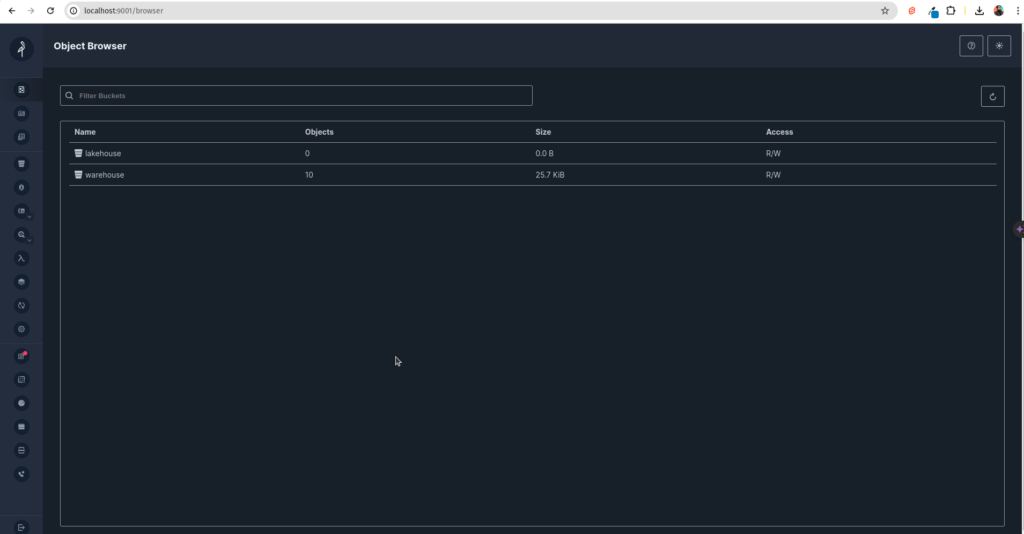
Now refresh minio; you’ll notice tables and files appear in your storage. Keep making additional requests with our sample data to add to the topic to see the process at work. Now, we can query the data. Just head over to localhost:9047, and let’s use Dremio.
Querying the Data With Dremio
After setting up your account Dremio at localhost:9047, click on “add source” in the bottom left corner and let’s add a “nessie” source with the following settings.
General (Connecting to Nessie Server)
- Set the name of the source to “nessie”
- Set the endpoint URL to “http://nessie:19120/api/v2” Set the authentication to “none”
Storage Settings
- For your access key, set “admin”
- For your secret key, set “password”
- Set root path to “warehouse”
- Set the following connection properties:
- fs.s3a.path.style.access = true
- fs.s3a.endpoint = minio:9000
- dremio.s3.compat = true
- Uncheck “encrypt connection” (since our local Nessie instance is running on http)
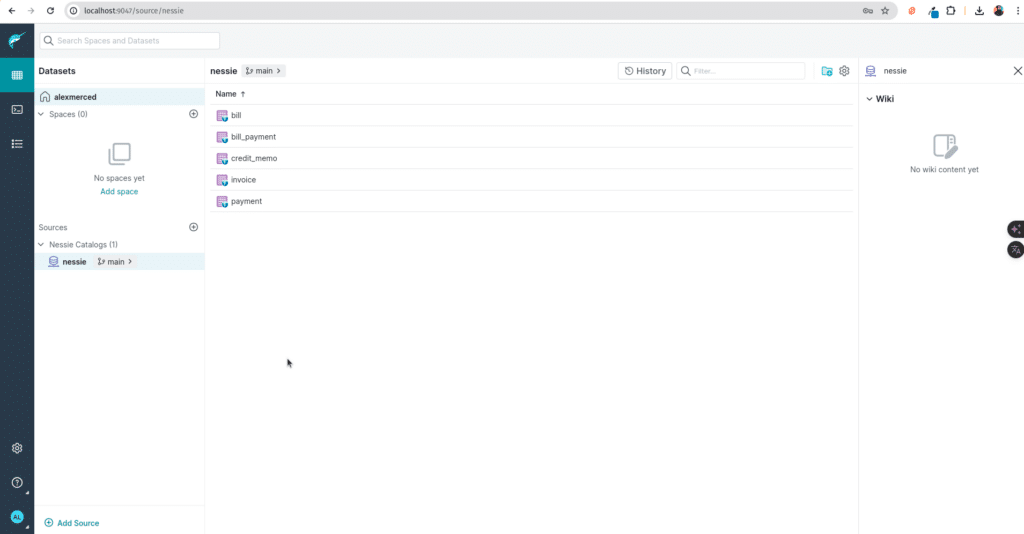
Once the connector is setup you’ll see our tables and can run queries on them:
Conclusion
This setup exemplifies how seamlessly data can flow from high-velocity streams into a structured, queryable format ready for in-depth analysis.
With its robust table format, Apache Iceberg enhances the management of large-scale analytics datasets within a data lakehouse architecture. We've bridged the gap between real-time data ingestion and persistent, analytical data storage by integrating it with Kafka through the Kafka Connect Iceberg connector. This integration simplifies data architectures and enhances their capabilities, allowing for real-time analytics and historical data analysis within the same framework.
Moreover, using Dremio as the analytical tool atop this architecture brings additional power to your data strategy. Dremio enables direct querying of Iceberg tables, making it a potent tool for delivering data to reports, dashboards, and analytical notebooks. The ease with which Dremio integrates into this setup underscores its capability to handle complex queries across both real-time and historical data, providing comprehensive insights that are crucial for informed decision-making.
This exercise hopefully illustrates that setting up a data pipeline from Kafka to Iceberg and then analyzing that data with Dremio is feasible, straightforward, and highly effective. It showcases how these tools can work in concert to streamline data workflows, reduce the complexity of data systems, and deliver actionable insights directly into the hands of users through reports and dashboards.
Sign up for AI Ready Data content
