Trying out any new project with dependencies and integrating a couple of technologies can be a bit daunting at first. However, it doesn’t have to be that way. Developer experience is super critical to everything we do here in the Dremio Tech Advocacy team. So, through this Notebook, the idea is to simplify configurations, etc., and help data engineers/practitioners quickly try out the various capabilities of the Apache Iceberg table format by using Nessie/Dremio Arctic as the catalog. By the end of this tutorial, we will have a functional lakehouse platform that enables us to do all sorts of data warehousing capabilities in the data lake.
Let’s start with setting up the project. Please note that the notebook with all the configuration parameters and the local Spark installation is made available as a docker image. So, we can just run the following command and get started with Nessie and Apache Iceberg.
docker run -p 8888:8888 --name spark-notebook alexmerced/spark33-notebook
For more details and instructions on how to get started with the docker image, read this.
Hands-on Exercise Setup
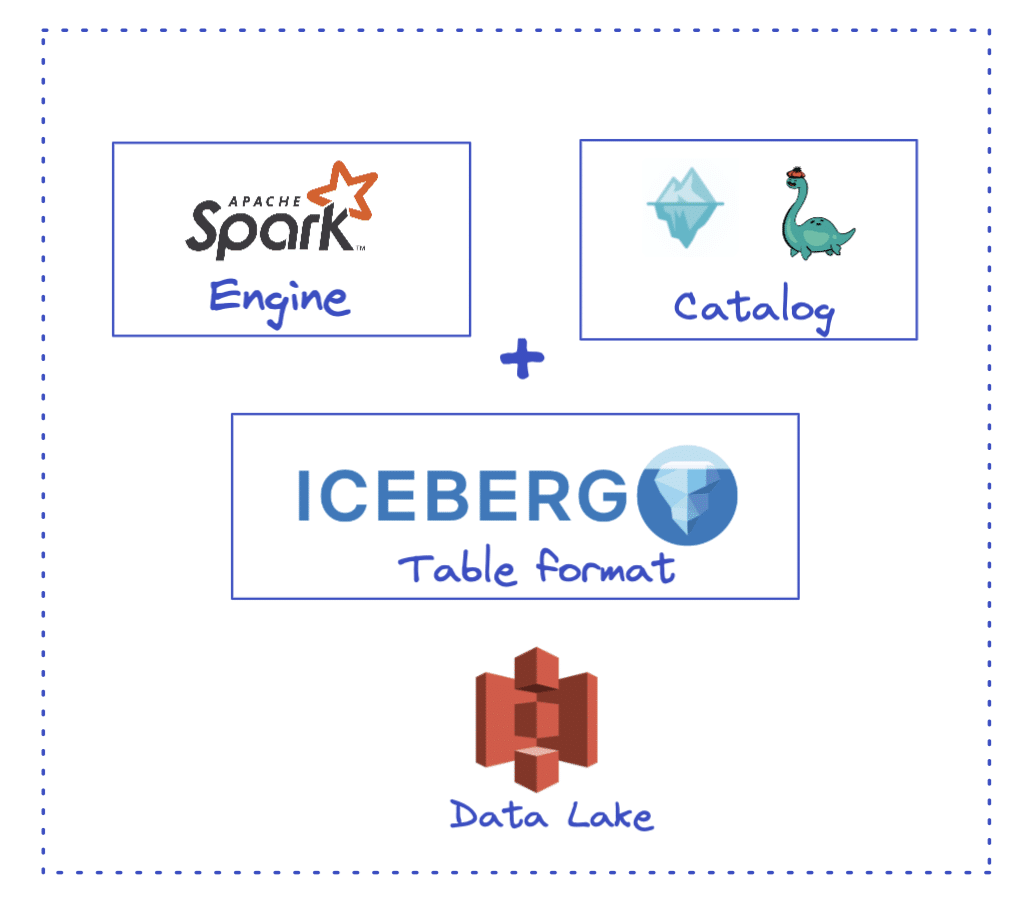
Our end goal is to have the setup shown in the image below. The following components will be involved in this setup:
- Table format - Our first component is the table format. A table format allows us to manage the data files in our data lake and brings in data management capabilities such as the ability to do DML, time travel, compaction, etc. It forms the basis of a Data Lakehouse architecture. The table format we will use here is Apache Iceberg.
- Catalog - The catalog is the next important component critical to working with Iceberg tables. It holds the reference to the current metadata file (a file that stores metadata information about the current table state). Catalogs bring in ACID guarantees to any transaction in Apache Iceberg. This is the first thing we will need to configure along with Iceberg’s configuration. For this demo, we will use Nessie/Dremio Arctic (a service based on Nessie) as our Iceberg catalog.
- Processing engine - The processing engine for this specific demo would be PySpark (Spark SQL). We will use it to create Iceberg tables & do various DML operations on the data files.
- Storage (Data lake) - All our raw data files will be stored in the data lake, which is an S3 bucket.

Configuration
Before starting our exercise, let’s delve into the configuration part to ensure we have the correct dependencies/packages for Iceberg, Nessie, and PySpark to work seamlessly.
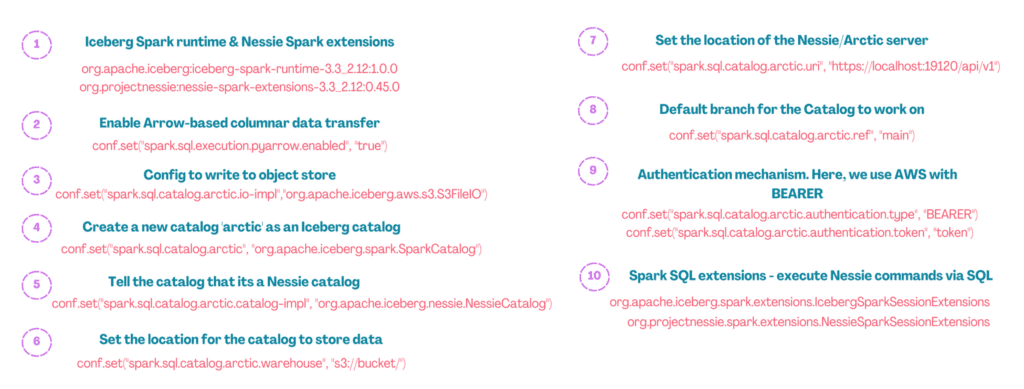
In total, there are around ten configurations, and these are described in the images below for quick reference.

Additional Configuration description
Most of the configurations described in the images above are self-explanatory. However, there are a few that need additional descriptions. We explain them below.
Config #1: The first configuration is the packages. Since we will work with Iceberg and Nessie using Spark as the engine, we need to have those packages. To access Nessie on Iceberg from a spark cluster, ensure the spark.jars spark option is set to include a jar of the iceberg spark runtime. As seen below, we also add the libraries for working with AWS S3.
conf.set("spark.jars.packages", f"org.apache.iceberg:iceberg-spark-runtime-3.3_2.12:1.0.0,org.projectnessie:nessie-spark-extensions-3.3_2.12:0.44.0,software.amazon.awssdk:bundle:2.17.178,software.amazon.awssdk:url-connection-client:2.17.178")Config #6: Here, we set the location for the Nessie catalog to store all the Iceberg-related data and metadata files. The engine (Spark) writes to this directory, so we must ensure we have the proper access. For this demo, we have used one of the S3 buckets.
conf.set("spark.sql.catalog.arctic.warehouse", "s3://bucket/")Config #7: This is where we set the location of the Nessie Server. If we install Nessie locally on our machine, the default URL (with default port) will be http://localhost:19120/api/v1. For this exercise, we have used Dremio Arctic URL. Dremio Arctic is a data lakehouse management service based on Nessie and brings in additional data optimization capabilities for the Iceberg tables.
conf.set("spark.sql.catalog.arctic.uri", "https://nessie.dremio.cloud/v1/..")Config #9: We set the authentication mechanism in this configuration. There are a couple of options as listed out here. In this demo, we use AWS authentication with a Bearer token.
conf.set("spark.sql.catalog.arctic.authentication.type", "BEARER")
conf.set("spark.sql.catalog.arctic.authentication.token", "TOKEN")
Please note that if you don’t choose to use any authentication mechanism, you can set the parameter as NONE.
Notebook
Prerequisites:
- Spark 3.3 installation
- Nessie installation (if we want to use local Nessie server)
Now that we are aware of all the config parameters, let’s start our exercise. First, let’s define a few environment variables in our Notebook related to AWS.
%env AWS_REGION='region'
%env AWS_ACCESS_KEY_ID='key'
%env AWS_SECRET_ACCESS_KEY='secret'
Next, we will install the two libraries for setting up PySpark:
pip install pyspark
pip install findspark
Finally, let’s define the configuration parameters (images above) in our Notebook to get some hands-on with Iceberg tables & the Nessie catalog using Spark. This is how the complete configuration code should look like.
import os
import findspark
from pyspark.sql import *
from pyspark import SparkConf

findspark.init()

conf = SparkConf()

#Config 1
conf.set(
    "spark.jars.packages",
    f"org.apache.iceberg:iceberg-spark-runtime-3.3_2.12:1.0.0,org.projectnessie:nessie-spark-extensions-3.3_2.12:0.44.0,software.amazon.awssdk:bundle:2.17.178,software.amazon.awssdk:url-connection-client:2.17.178",
)

#Config 2
conf.set("spark.sql.execution.pyarrow.enabled", "true")

#Config 3
conf.set("spark.sql.catalog.arctic", "org.apache.iceberg.spark.SparkCatalog")

#Config 4
conf.set("spark.sql.catalog.arctic.catalog-impl", "org.apache.iceberg.nessie.NessieCatalog")

#Config 5
conf.set("spark.sql.catalog.arctic.warehouse", "s3://bucket/")

#Config 6
conf.set("spark.sql.catalog.arctic.uri", "https://nessie.dremio.cloud/v1/repositories/..")

#Config 7
conf.set("spark.sql.catalog.arctic.ref", "main")

#Config 8
conf.set("spark.sql.catalog.arctic.authentication.type", "BEARER")
conf.set("spark.sql.catalog.arctic.authentication.token", "token")

#Config 9
conf.set(
    "spark.sql.extensions",    "org.apache.iceberg.spark.extensions.IcebergSparkSessionExtensions,org.projectnessie.spark.extensions.NessieSparkSessionExtensions")

#Run Spark
spark = SparkSession.builder.config(conf=conf).getOrCreate()
print("Spark Running")
Once we execute this block, we should see all the dependencies getting downloaded with output like the below. Please note that it might take a while to download these artifacts for first time connections.

Iceberg Tables - CRUD operations
We now have all the configurations set and can play around with creating Iceberg tables and doing all sorts of DML operations.
One of the amazing things about using Nessie/Dremio Arctic as a catalog is that it lets us manage data as code, which allows us to use Git-like branching capabilities to create isolated branches, ensuring no impact on the production environment’s data.
So, let’s create our branch called ‘work’ and use that branch for getting hands-on with Iceberg.
spark.sql("CREATE BRANCH work IN arctic").toPandas()
spark.sql("USE REFERENCE work IN arctic")
CREATE TABLE
Once we are in the ‘work’ branch, we will create our first Iceberg table using the following query:
spark.sql(
    """CREATE TABLE IF NOT EXISTS arctic.salesdip.sales
            (id STRING, name STRING, product STRING, price STRING, date STRING) USING iceberg"""
)
INSERT
Now let’s insert some data in this table. We will insert the data from an already existing CSV file for this specific demo. The file is stored locally on the demo machine. A production use case would likely take feeds from official data sources.
As a good practice, we will first insert the data into a Temporary view and then into the actual table sales.
spark.sql(
    """CREATE OR REPLACE TEMPORARY VIEW salesview USING csv
            OPTIONS (path "salesdata.csv", header true)"""
)
spark.sql("INSERT INTO arctic.salesdip.sales SELECT * FROM salesview")
READ
Now that we have the Iceberg table with the newly inserted records, let’s try to query the data.
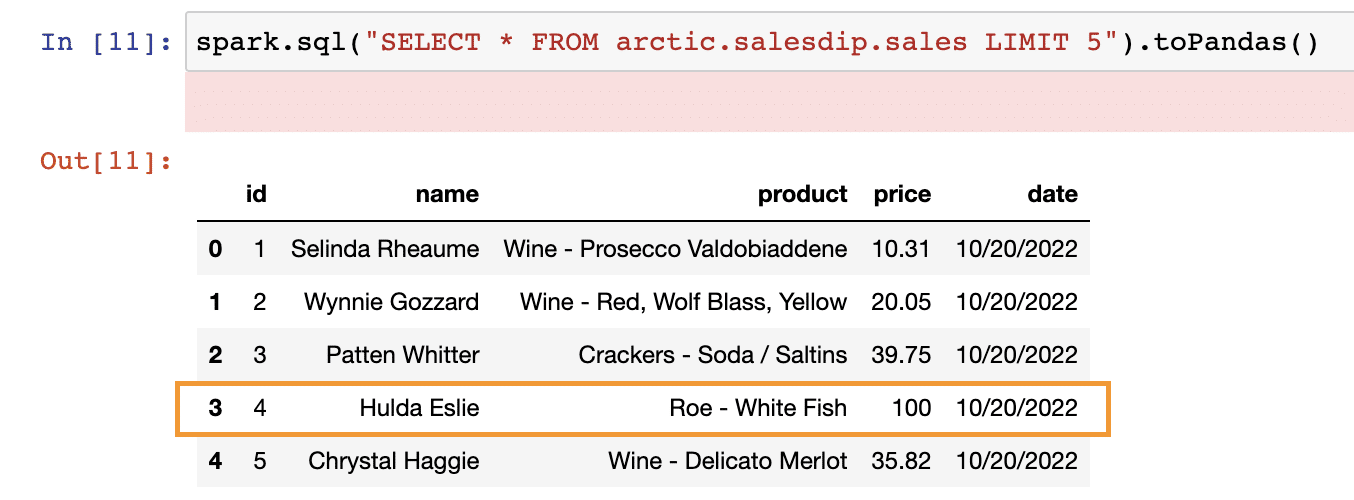
spark.sql("SELECT * FROM arctic.salesdip.sales LIMIT 5").toPandas()And here is the output:

UPDATE
To test out UPDATE operation, let us update the price of all the items with (id = 4) to $100
spark.sql("UPDATE arctic.salesdip.sales SET price = 100 WHERE id = 4")Now if we run the same read query as above, we should see the update price for id = 4

Great! We were able to run a couple of CRUD operations in Apache Iceberg and see how robust the format is.
Apache Iceberg also provides various metadata tables out-of-the-box so we can query them and keep track of the table’s history, snapshots, manifests, etc. These tables can be highly beneficial for understanding all the operations run in an Iceberg table, rolled-back commits, etc.
For the sake of this exercise, let’s query a few of them.
Table History
spark.sql("SELECT * FROM arctic.salesdip.sales.history").toPandas()
Snapshots
spark.sql("SELECT * FROM arctic.salesdip.sales.snapshots").toPandas()
Files
spark.sql("SELECT * FROM arctic.salesdip.sales.files").toPandas()
Time Travel using Iceberg
Using snapshots, we can also take advantage of critical capabilities, such as Time travel in Apache Iceberg. From the above Snapshots table, we can see three snapshots based on our operations. Recall that we updated the price of all the items whose id = 4 in our last CRUD operation. Let’s say we need to get the original data before the UPDATE operation.
Iceberg provides 2 ways to do so -
- Using snapshot ID
- Using the commited_at timestamp
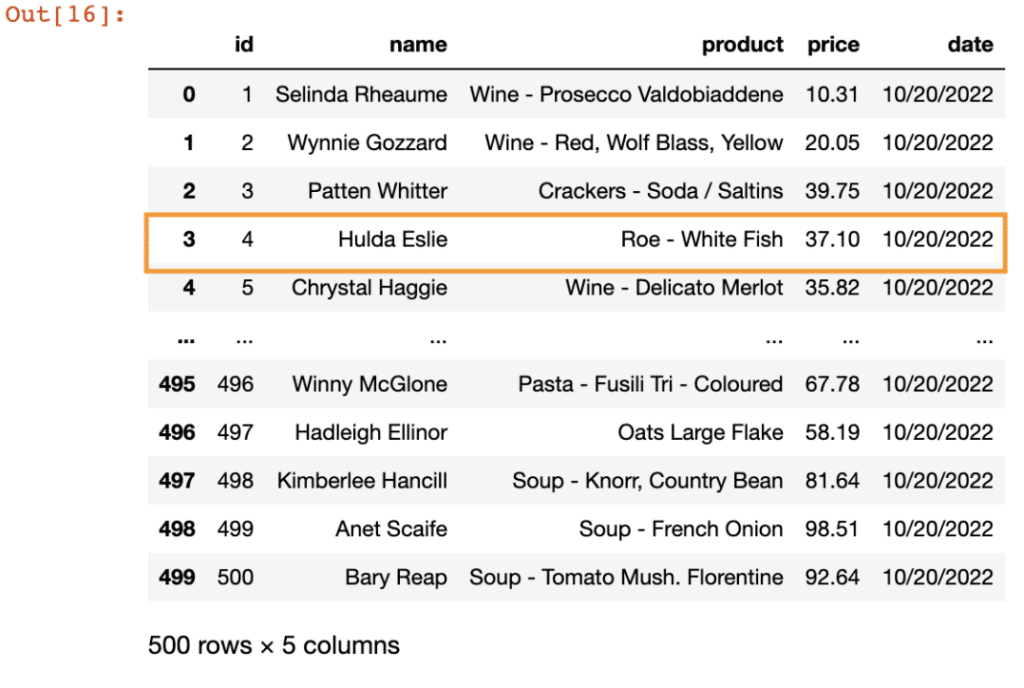
Here, we will use the snapshot committed time to get our data. Let’s run this query,
spark.sql("SELECT * FROM arctic.salesdip.sales TIMESTAMP AS OF '2022-11-25 19:00:31.662' ").toPandas()And here’s the data,

As you can see, we now have the data from the past before we updated the price to $100.
Conclusion
That brings us to the end of this hands-on tutorial on trying out the Nessie catalog with Apache Iceberg using PySpark. Iceberg brings in capabilities such as ACID compliance, full schema evolution, partition evolution, time travel, etc., that enable data warehouse-level functionalities in a data lake with data in open file and table formats. In addition, project Nessie gives us the advantage of git-like branching capabilities, which enables us to create isolated branches to carry out our data experiments without impacting the production data.