28 minute read · August 24, 2022
A Hands-On Look at the Structure of an Apache Iceberg Table
· Developer Advocate, Dremio

Apache Iceberg is a high-performance, open table format for large-scale analytics. It has rapidly gained momentum as the standard for table formats in a data lake architecture. Iceberg brings capabilities such as ACID compliance, full schema evolution (using SQL), partition evolution, time travel, etc., that address some of the key problems within data lakes and enable warehouse-level functionalities. What allows Iceberg to facilitate these capabilities and achieve high performance is the way it is designed. The diagram below illustrates the high-level components that form the Iceberg architecture.
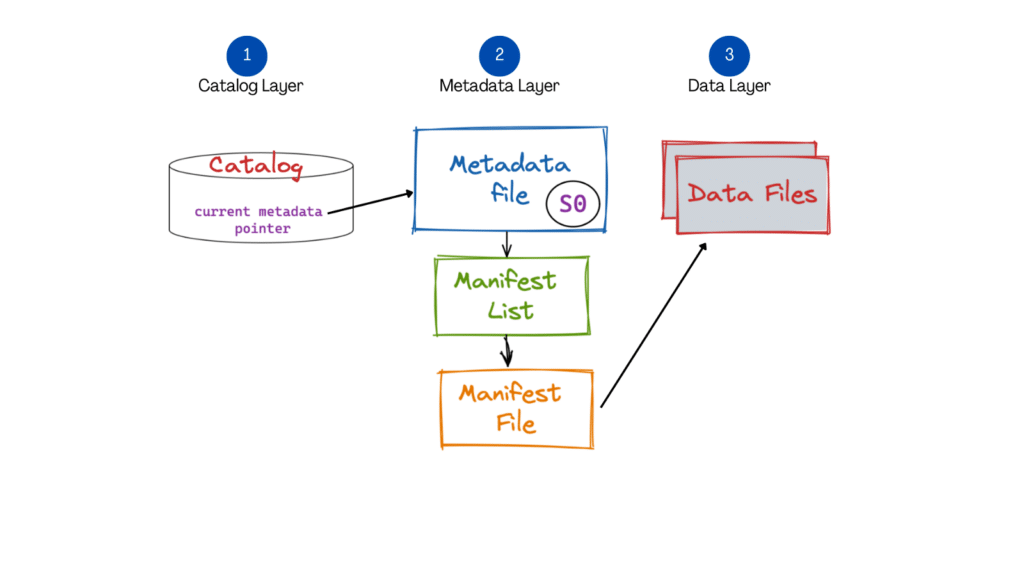
In this blog, we will deep dive into the structure of Apache Iceberg from a practical point of view. The idea is to help developers familiarize themselves with these components through hands-on experience.
One of the many great things about Apache Iceberg is that it allows multiple processing engines (Spark, Dremio, Flink, etc.) to work on the same dataset. Apache Spark is one of the most commonly used engines. We will use Dremio Sonar, a SQL-based distributed query engine for interfacing with Apache Iceberg, for this specific exercise. Dremio provides an intuitive UI to create Iceberg tables and run DML operations (insert, update, delete, upsert) directly on your data lake. Let’s dive in.
Setup
- Data lake: To store the data files, we will use Amazon S3.
- Catalog: We will use the default HDFS catalog to limit the number of third-party tools and for the purpose of simplicity.
- Processing engine: Dremio Sonar will be our processing engine for working with Iceberg tables.
The dataset we will use for this blog is the NYC Yellow Taxi dataset loaded into our data lake in Amazon S3. After each step, we will investigate how things look in our data lake file system.
Create Table (CTAS)
We will start by creating our first Iceberg table using a dataset we will load in Amazon S3. For this tutorial, we use the New York City Taxi & Limousine Commission April 2022 dataset. Now, let’s go to the Dremio UI and add a new S3 data source. After successfully adding the data source, you can see it under the “Sources” section of Dremio. Dremio makes it super easy for users to connect directly to their data lake source and allows querying on the data. We should be able to see the dataset file named yellow_tripdata_2022–04.parquet here.
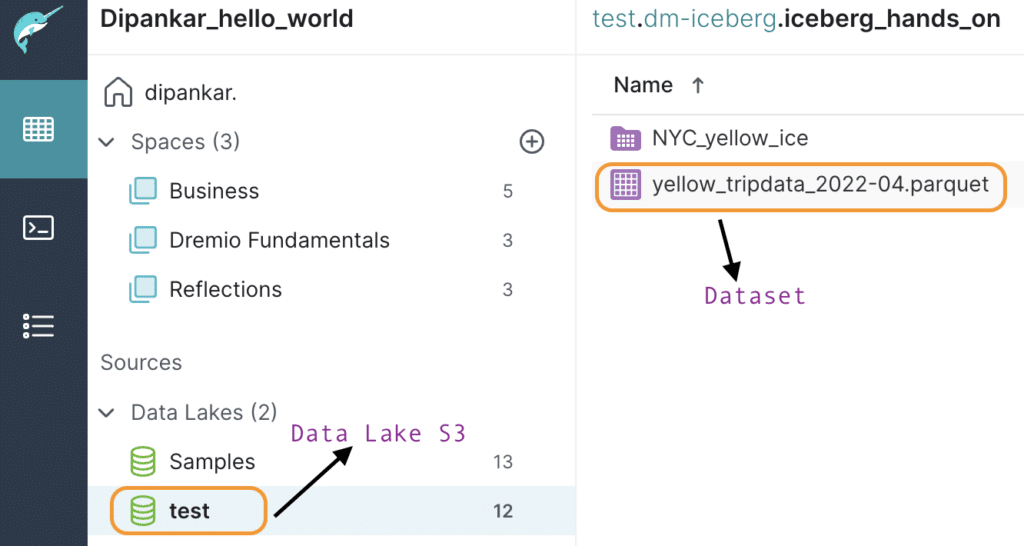
Let’s go ahead and create the Iceberg table using the following command:
CREATE TABLE NYC_trip_ice AS
SELECT * FROM "yellow_tripdata_2022-04.parquet"
Please note that for this tutorial we used a CTAS statement. You can refer to this blog to explore the other available options to create a table.
The snippet below shows that the table was successfully created. Dremio also presents some of the details, such as the path of the table, partition, file size, etc., which describes the table.

Now, let’s see what Iceberg did under the hood .
1. Created a directory called NYC_trip_ice (the table name).

2. Under this folder, it created 2 sub-folders.

a. The first one consists of the actual data files. Since we used an existing dataset to create the Iceberg table, it wrote the records here in this folder as 2_12_0.parquet. Please note that you will not see the data folder if you create a table without any records (CREATE TABLE).
b. The second folder, “metadata,” consists of the following four files:
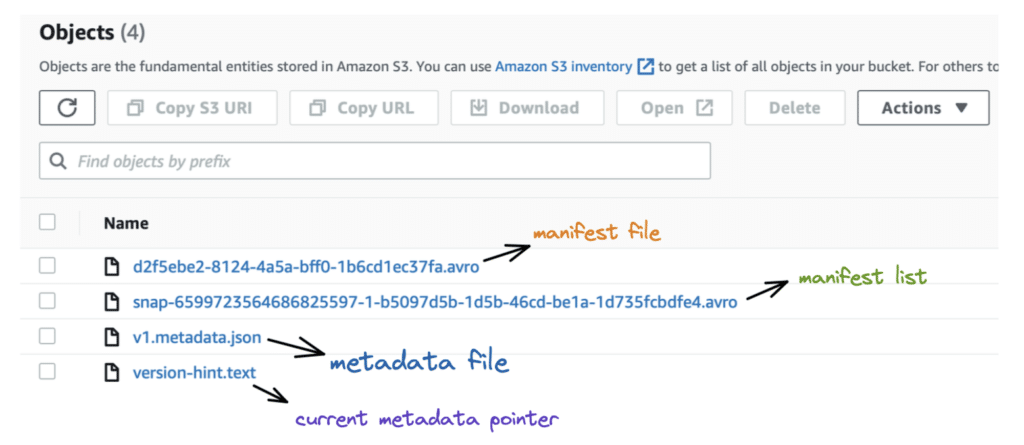
- The
version-hint.textfile contains the reference to the latest metadata file. - The
v1.metadata.jsonis the metadata file. - The
snap-6599723564686825597–1-b5097d5b-1d5b-46cd-be1a-1d735fcbdfe4.avrofile is the manifest list. - The
d2f5ebe2–8124–4a5a-bff0–1b6cd1ec37fa.avrois the manifest file.
Now we will inspect each of the files present in the metadata folder. Our objective is to understand how Iceberg created the table with records written to 2_12_0.parquet (our data file). This would also be a good debugging exercise for any issues you may face in the future.
Analyzing the files
Catalog file: Current metadata file reference.
If we open the version-hint.text file, we can see the version number, which is “1” in this case, pointing to the current metadata file number, i.e., v1.metadata.json.

Metadata file: A metadata file stores metadata about a table at a certain point in time.
Upon opening the current metadata file, v1.metadata.json, we can see details such as the table’s schema, partition specifications, current snapshot id, etc., as seen in the excerpt below. One critical detail in the metadata file is the current-snapshot-id which gives us the latest snapshot — the state of the table at that given point. We would need this information to find out the manifest list.
{
 "format-version" : 1,
 "table-uuid" : "dba0cf2e-e7ba-4a0f-b41c-366378994d8f",
 "location" : "s3://dm-iceberg/iceberg-emr/NYC_trip_ice",
 "last-updated-ms" : 1658756162215,
 "last-column-id" : 19,
 "schema" : {
	"type" : "struct",
	"schema-id" : 0,
   	"fields" : [ {
  		"id" : 1,
		"name" : "VendorID",
  		"required" : false,
 		"type" : "long"
 	}
 	"current-snapshot-id" : 6599723564686825597,
 	"refs" : {
		"main" : {
     		"snapshot-id" : 6599723564686825597,
			"type" : "branch"
		}
 },
So, if you use the snapshot-id 6599723564686825597 to look into the snapshots array, you will find all the details regarding this particular snapshot (as seen in the snippet below). For example, we can see that the operation associated with this snapshot was an “append” when Iceberg inserted all the records of our dataset during the table creation step. Now, we can get the “manifest-list” from here.
"snapshots" : [ {
	"snapshot-id" : 6599723564686825597,
	"timestamp-ms" : 1658756162215,
	"summary" : {
		"operation" : "append",
		"added-data-files" : "1",
		"added-records" : "3599920",
		"total-records" : "3599920",
		"total-files-size" : "0",
		"total-data-files" : "1",
		"total-delete-files" : "0",
		"total-position-deletes" : "0",
		"total-equality-deletes" : "0"
	},
	"manifest-list" :
"s3://dm-iceberg/iceberg-emr/NYC_trip_ice/metadata/snap-6599723564686825597-1-b5097d5b-1d5b-46cd-be1a-1d735fcbdfe4.avro",
	"schema-id" : 0
 } ],
Manifest list: A manifest list is a list of all the manifest files.
Inspecting the manifest list, we find the manifest file path.
{
"manifest_path":
"s3://dm-iceberg/iceberg-emr/NYC_trip_ice/metadata/d2f5ebe2-8124-4a5a-bff0-1b6cd1ec37fa.avro",
	"manifest_length": 7292,
    "partition_spec_id": 0,
    "added_snapshot_id": 6599723564686825597,
    "added_data_files_count": 1,
    "existing_data_files_count": 0,
    "deleted_data_files_count": 0,
    "partitions": [
	],
	"added_rows_count": 3599920,
    "existing_rows_count": 0,
    "deleted_rows_count": 0
}
Manifest file: A manifest file keeps a track of all the data files along with details and stats about each data file.
Let’s inspect the manifest file.
{
	   "status" : 1,
       "snapshot_id" : null,
       "data_file" : {
       		"file_path" :
"s3://dm-iceberg/iceberg-emr/NYC_trip_ice/1d2163d3-9058-a238-624b-5d31e0a55100/2_12_0.parquet",
			"file_format" : "PARQUET",
            "partition" : {},
            "record_count" : 3599920,
            "file_size_in_bytes" : 119098431,
            "block_size_in_bytes" : 67108864,
            "column_sizes" : [],
            "value_counts" : [],
            "null_value_counts" : [],
            "nan_value_counts" : [],
            "lower_bounds" : [],
            "upper_bounds" : [],
            "key_metadata" : null,
            "split_offsets" : null,
            "sort_order_id" : 0
	}
}
The manifest file finally leads us to the data file 2_12_0.parquet, which was created as part of the CTAS operation.
Until now, we have learned what happens behind the scenes when we create an Iceberg table using an existing set of records by reverse engineering the process. Now, let’s manually INSERT some records and focus on how the write process works.
INSERT
We will run the following statement to insert a new record from Dremio and see how things change with our Iceberg metadata files:
INSERT INTO NYC_trip_ice("VendorID", "tpep_pickup_datetime", "tpep_dropoff_datetime", "passenger_count", "trip_distance", "RatecodeID", "store_and_fwd_flag", "PULocationID","DOLocationID", "payment_type", "fare_amount", "extra", "mta_tax", "tip_amount", "tolls_amount", "improvement_surcharge", "total_amount", "congestion_surcharge", "airport_fee")

VALUES

(10, '2022-04-01 00:21:13.000', '2022-04-01 00:58:33.000', 3, 5.5, 1, 'N', 111, 30, 1, 40, 3, 0.5, 10, 0, 0.3, 53.8, 2, 0)
Now going back to the base directory NYC_trip_ice/, we can see that :
1. There are two data folders and one metadata folder as seen in the snippet below. Since we inserted a new record, Iceberg created the second file, 0_0_0.parquet and placed it under the new folder (highlighted).
Note that each data folder has a UUID which is specific to the Dremio Sonar engine but is Iceberg-compliant. In scenarios where you use Apache Spark as the engine to insert records to Iceberg tables, you will see a /data folder with all the data files.

If we open the data file 0_0_0.parquet, we can see that this is indeed the same record we inserted, as shown below.

2. Inside the metadata directory, we now have seven files. So, the INSERT operation added three new files, as shown below.
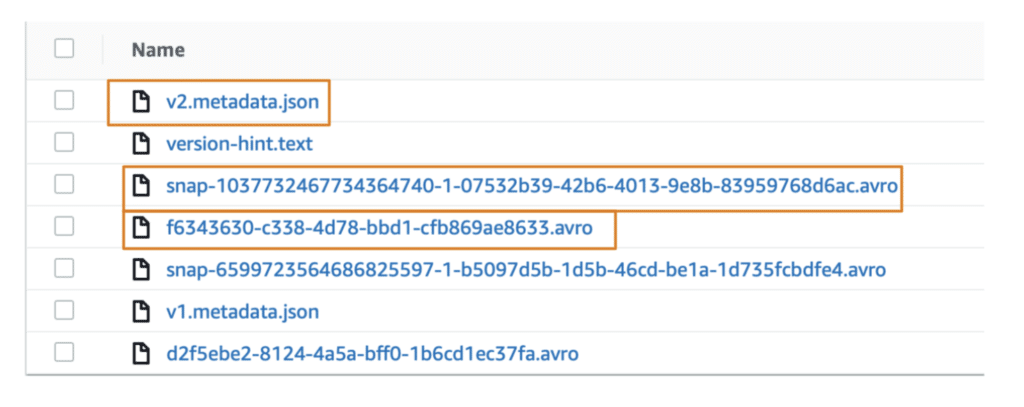
Here’s a visual explanation of what happens with each of the Iceberg components when an INSERT is run.
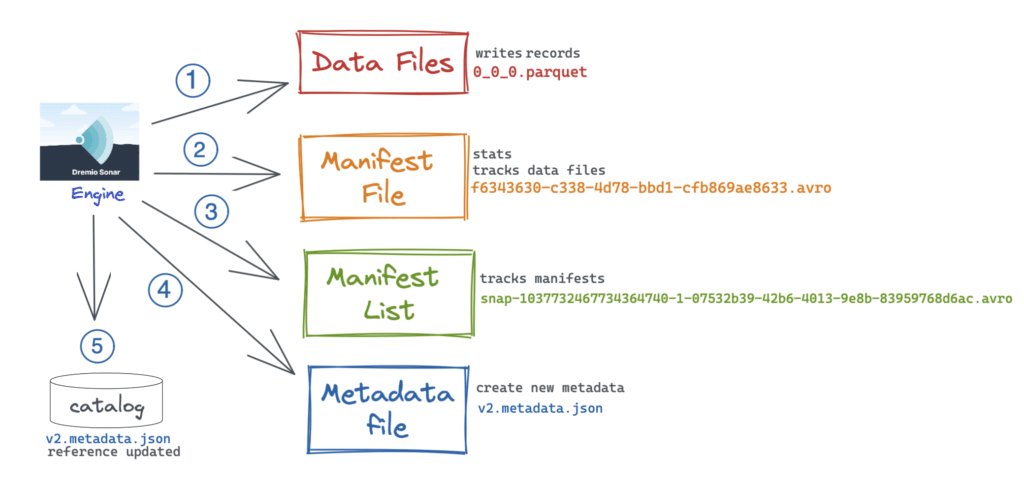
- Engine writes the records to the data files in Parquet format.
- Engine knows about statistics such as upper/lower values of a column, null counts, etc., and writes them into the manifest file.
- It creates the manifest list to keep track of the manifest files.
- It then replaces the v1 of the metadata file (created during table creation), reads and appends the new changes, and creates the
v2.metadata.json. - The catalog is updated with the reference to the v2 metadata file instead of v1.
Analyzing the files
Catalog file: The version-hint.text file now has the value “2,” which points to the v2.metadata.json, the current metadata file.

Metadata file: Now, let’s inspect the latest metadata file v2.metadata.json.
"current-snapshot-id" : 1037732467734364740,
 "refs" : {
    "main" : {
         "snapshot-id" : 1037732467734364740,
         "type" : "branch"
     }
},
"snapshots" : [ {
    "snapshot-id" : 6599723564686825597,
}, {
    "snapshot-id" : 1037732467734364740,
    "parent-snapshot-id" : 6599723564686825597,
    "summary" : {
          "operation" : "append",
          "added-data-files" : "1",
          "added-records" : "1",
          "total-records" : "3599921",
     },
     "manifest-list" : "s3://dm-iceberg/iceberg-emr/NYC_trip_ice/metadata/snap-1037732467734364740-1-07532b39-42b6-4013-9e8b-83959768d6ac.avro",
} ]
As you can see, this new operation has changed the current snapshot id (highlighted above). You can now use this id to look into the snapshots array and find manifest-list.
Manifest list: As discussed, a manifest list keeps track of all the manifest files. So, this file holds information about both the previous manifest file as well as the present. We can see the manifest path for our specific snapshot here:
{
 "manifest_path":
"s3://dm-iceberg/iceberg-emr/NYC_trip_ice/metadata/f6343630-c338-4d78-bbd1-cfb869ae8633.avro",
 "manifest_length": 7075,
 "partition_spec_id": 0,
 "added_snapshot_id": 1037732467734364740,
 "added_data_files_count": 1,
 "existing_data_files_count": 0,
 "deleted_data_files_count": 0,
 "partitions": [
 ],
 "added_rows_count": 1,
 "existing_rows_count": 0,
 "deleted_rows_count": 0
}
Manifest file: The manifest file ultimately points to the data file 0_0_0.parquet, which was generated when we inserted the one record.
{
	"status" : 1,
  	"snapshot_id" : null,
 	"data_file" : {
		"file_path" :
"s3://dm-iceberg/iceberg-emr/NYC_trip_ice/1d210bfc-1cd9-ba50-460b-10ec5e15a600/0_0_0.parquet",
		"file_format" : "PARQUET",
        "partition" : {},
        "record_count" : 1,
        "file_size_in_bytes" : 7267,
        "block_size_in_bytes" : 67108864,
        "column_sizes" : [],
        "value_counts" : [],
        "null_value_counts" : [],
        "nan_value_counts" : [],
        "lower_bounds" : [],
        "upper_bounds" : [],
        "key_metadata" : null,
        "split_offsets" : null,
        "sort_order_id" : 0
     }
}
UPDATE
For our last use case, we will update a specific record using Dremio to understand the internals of Iceberg. We will use the following command to update a particular vendor’s passenger count:
UPDATE NYC_trip_ice
SET "passenger_count" = 5
WHERE "VendorID" = 10
This time, Iceberg:
1. Created another data folder with a new file called 3_50_0.parquet. Opening this file shows us the updated record.

2. Added one new manifest list in the metadata folder based on the new snapshot for UPDATE.
Analyzing the files
Catalog file: The version-hint.text file now has the value “3,” thereby pointing to the latest metadata file v3.metadata.json.

Metadata file: We can see all the three snapshots for the three operations we ran as part of this exercise. The current snapshot id is 2171408509165376262.
"current-snapshot-id" : 2171408509165376262,
 "refs" : {
    "main" : {
         "snapshot-id" : 2171408509165376262,
         "type" : "branch"
    }
 },
 "snapshots" : [ {
         "snapshot-id" : 6599723564686825597, //CTAS
         "timestamp-ms" : 1658756162215,
         "manifest-list" :
 "s3://dm-iceberg/iceberg-emr/NYC_trip_ice/metadata/snap-6599723564686825597-1-b5097d5b-1d5b-46cd-be1a-1d735fcbdfe4.avro",
 },
{
          "snapshot-id" : 1037732467734364740, //INSERT
          "parent-snapshot-id" : 6599723564686825597,
          "timestamp-ms" : 1658778638444,
          "manifest-list" :
 "s3://dm-iceberg/iceberg-emr/NYC_trip_ice/metadata/snap-1037732467734364740-1-07532b39-42b6-4013-9e8b-83959768d6ac.avro",
 },
{
           "snapshot-id" : 2171408509165376262, //UPDATE
           "parent-snapshot-id" : 190005218247617315,
           "timestamp-ms" : 1658850968264,
           "manifest-list" :
 "s3://dm-iceberg/iceberg-emr/NYC_trip_ice/metadata/snap-2171408509165376262-1-09ff20f1-880e-4e0e-b5cb-ae57e2e5d9fa.avro",
 } ],
Manifest list: Let’s take a look at the manifest list based on our snapshot.
{
 "manifest_path":
"s3://dm-iceberg/iceberg-emr/NYC_trip_ice/metadata/2483a183-5c89-4a47-95b7-e67ddc06e72c.avro",
 "manifest_length": 7077,
 "partition_spec_id": 0,
 "added_snapshot_id": 2171408509165376262,
 "added_data_files_count": 1,
 "existing_data_files_count": 0,
 "deleted_data_files_count": 0,
 "partitions": [

 ],
 "added_rows_count": 1,
 "existing_rows_count": 0,
 "deleted_rows_count": 0
}
Manifest file: And finally, inspecting the manifest file, we see the newly added data file 3_50_0.parquet as part of the UPDATE operation.
{
	"status" : 1,
	"snapshot_id" : null,
	"data_file" : {
		"file_path" :
 "s3://dm-iceberg/iceberg-emr/NYC_trip_ice/1d1ff202-af74-bba7-0448-575e64379a00/3_50_0.parquet",
        "file_format" : "PARQUET",
        "partition" : {},
        "record_count" : 1,
        "file_size_in_bytes" : 7267,
        "block_size_in_bytes" : 67108864,
        "column_sizes" : [],
        "value_counts" : [],
        "null_value_counts" : [],
        "nan_value_counts" : [],
        "lower_bounds" : [],
        "upper_bounds" : [],
        "key_metadata" : null,
        "split_offsets" : null,
        "sort_order_id" : 0
	}
}
To recap, we have discussed how the various operations such as CREATE, INSERT, and UPDATE work internally in Apache Iceberg and how the metadata files can help us debug issues with these operations.
Metadata Tables
Apache Iceberg provides easy access to table-specific information such as a table’s history, snapshots, and other metadata via metadata tables. The metadata tables can be very helpful in getting a holistic picture of all the operations run in a table, rolled back commits, details about snapshots, etc. You can query these metadata files directly from the Dremio UI.
Data files :
We can query a table’s data files using the table_files() function as shown below:
SELECT * FROM TABLE ( table_files('NYC_trip_ice'))The output records present us with details such as file paths, file formats, record count, and other relevant statistics about the files.

You can see the two data files generated as part of the CTAS and the INSERT operation that we ran as part of this blog.
Example use case: Are there too many small files in my Iceberg table?
For this use case, you can use the Data files table to retrieve the total number of data files present in the table and understand the file size, number of records, etc., for each file. You can then compact the smaller data files into a large one.
History :
A table’s history shows information such as snapshot id, parent snapshot id, if a snapshot is an ancestor of the current table state, etc. Let’s query the history table in Dremio using the table_history() method.
SELECT * FROM TABLE ( table_history('NYC_trip_ice'))
The result above shows the current state of our Iceberg table. In a production environment, your history table will probably have many snapshots. You can use the snapshot_id to find details specific to that snapshot.
Example use case: How can I see any rolled back commits from my Iceberg table? Fields such as parent_id and is_current_ancestor can be very helpful in a scenario like this.

As shown from the image above, the highlighted snapshots have the same parent_id, but the is_current_ancestor field is false for one, which implies that this commit was rolled back.
Manifest file :
This shows the table’s current manifest files. To query the manifest files, you can use the table_manifests() method in Dremio.
SELECT * FROM TABLE ( table_manifests('NYC_trip_ice'))
Example use case: How do we find out how many data files were added or removed as part of a specific manifest file?
Manifest file table provides a count of the added or deleted data files based on individual manifest files.
Snapshots :
You can query all the valid snapshots for your Iceberg table using this metadata table. In Dremio, you can use the table_snapshot() method to query the snapshots.
SELECT * FROM TABLE ( table_snapshot('NYC_trip_ice'))As you can see, for our specific example, the above query retrieves all the three snapshots based on the three operations: CTAS, INSERT, and UPDATE.

Example use case: I want to run a query against an older snapshot. How do I do that?
You can use the Snapshots table committed_at field or snapshot_id to query historical snapshots. It would be a good idea to also look at the History table first to get info on any rolled back commits, etc.
Conclusion
This article discussed the internal working mechanism of Apache Iceberg for the various CRUD operations using Dremio Sonar as the compute engine. We investigated how the paths and metadata files change with each of these operations and how metadata files can be of help with debugging any issues. If you are interested in learning more about each component conceptually, here is a great article.
Learn More


