11 minute read · September 9, 2022
Getting Started with Apache Iceberg in Databricks

· Solution Architect, Dremio

Apache Iceberg is a high-performance and open table format for huge analytic tables. The following details how you can get started using Iceberg in Databricks in just a few steps. This walk-through uses Databricks in Azure, but regardless of the cloud you use the steps are the same.
Step 1: Download the Iceberg Jar File
Download the Iceberg runtime jar, making sure to select the jar that matches the Spark version in your Databricks cluster. The Spark version can be found in Compute -> Cluster -> Configuration: Databricks Runtime Version. The Iceberg runtime support can be found here, but please note that the versions must match (you cannot just use the latest runtime).
This tutorial uses Databricks Runtime 10.4 ( Spark 3.2 ), so I have downloaded “iceberg-spark-runtime-3.2_2.12” from the link above.

Step 2: Import the Iceberg Jar File
In your Databricks workspace, go to Compute -> Cluster -> Libraries and add the Runtime Jar downloaded in the previous step via the “Install new” button.

Step 3: Amend Cluster Configuration to Enable Iceberg
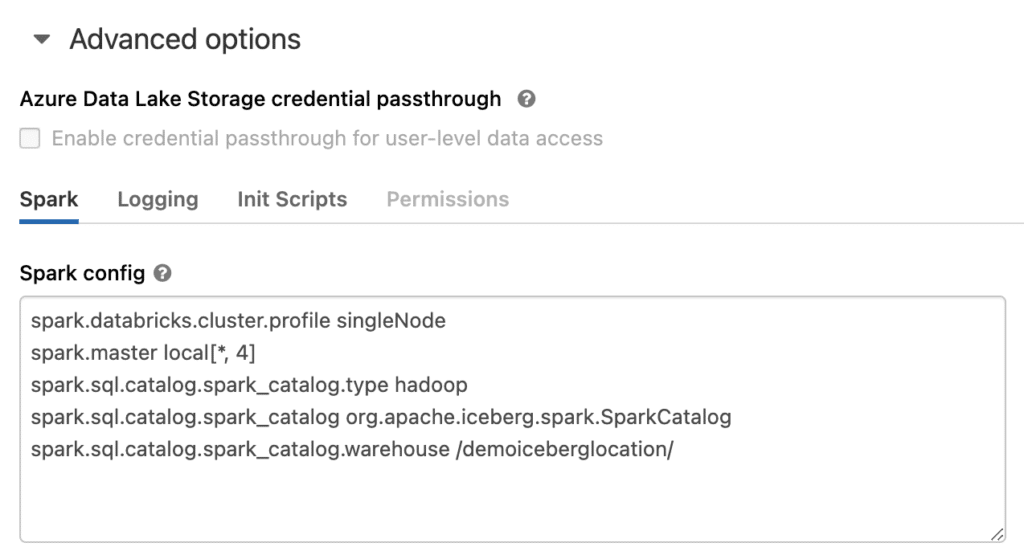
Amend your cluster configuration via Configuration -> Advanced Options -> Spark Config to include the following lines:
spark.sql.catalog.spark_catalog org.apache.iceberg.spark.SparkCatalog
spark.sql.catalog.spark_catalog.type hadoop
spark.sql.catalog.spark_catalog.warehouse /<folder for iceberg data>/
This creates the catalog necessary for working with Iceberg tables. When spark.sql.catalog.spark_catalog.type is set to hadoop Databricks creates a file system based table; when it is set to “hive” it uses the metastore, which is discussed later.
The spark.sql.catalog.spark_catalog.warehouse value determines where the table will be created, and if just supplying a path then DBFS is assumed. This will be changed later to use alternative storage.
The advanced options look like the following:
Step 4: Create and use Iceberg Tables from Databricks Spark
Create a new notebook and execute the following in it:
%sql
CREATE TABLE default.test_table_1 (id bigint, data string)
USING ICEBERG ;

INSERT INTO default.test_table_1
SELECT 1, 'test';

SELECT *
FROM default.test_table_1;
You should see that the Iceberg table is created in the expected DBFS location:

Step 5: Configure Spark to Store Data in an External Data Lake
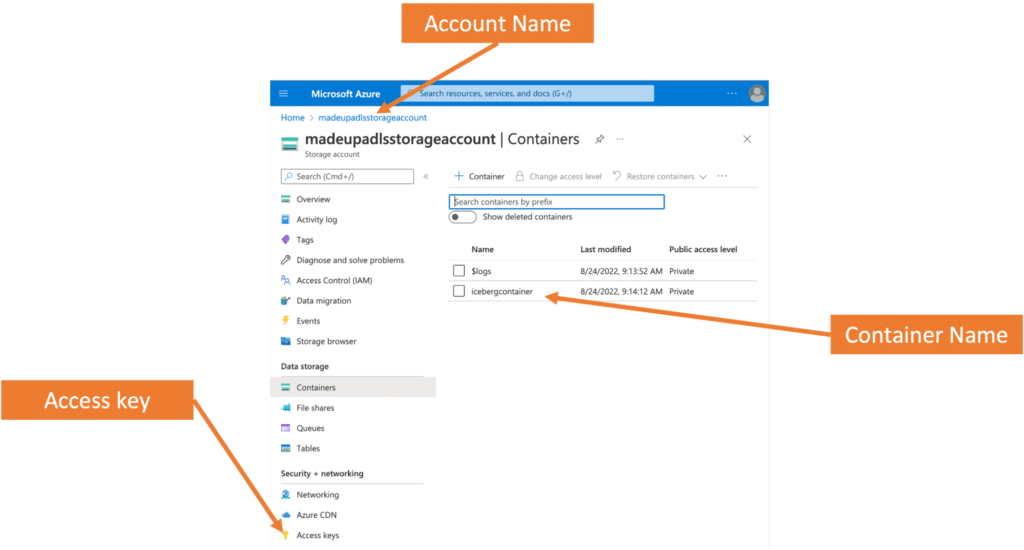
Since the Iceberg table is created in DBFS, only Databricks services can access it. So the next step is to instead use your own storage account; this example uses ADLS to store the Iceberg table. First, you need an Azure Data Lake Storage Account (Gen2). To create an account, simply follow the directions provided in the documentation. For an existing account, you need your account name, container, and account key which can be found in the properties of the storage account in the Azure portal:
Add the following key to your cluster in Configuration -> Advanced Options -> Spark Config:
fs.azure.account.key.<Your ADLS Storage Account
Name>.blob.core.windows.net <Your ADLS Access Key>
Replace the existing spark.sql.catalog.spark_catalog.warehouse value to be:
spark.sql.catalog.spark_catalog.warehouse wasbs://<Your ADLS Container Name>@<Your ADLS Storage Account Name>.blob.core.windows.net/<Optional Folder Location>/
Here are the new advanced options:
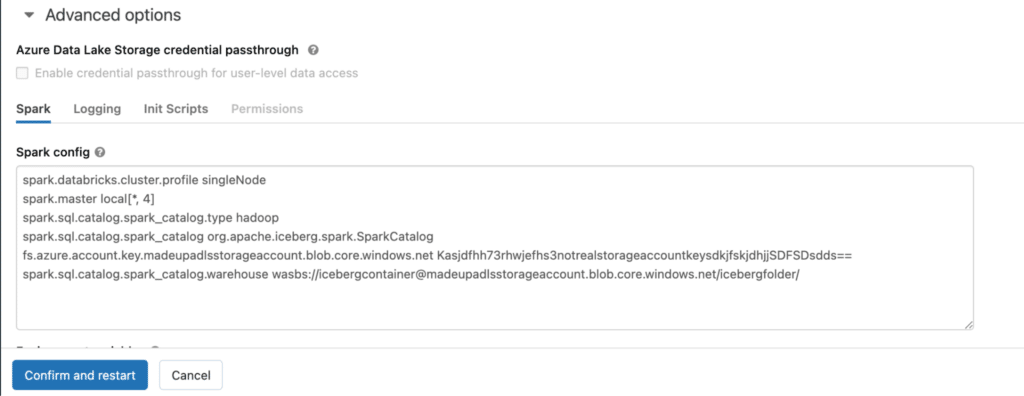
Once amended, click “Confirm and restart” to save the settings and restart your cluster so the changes take effect.
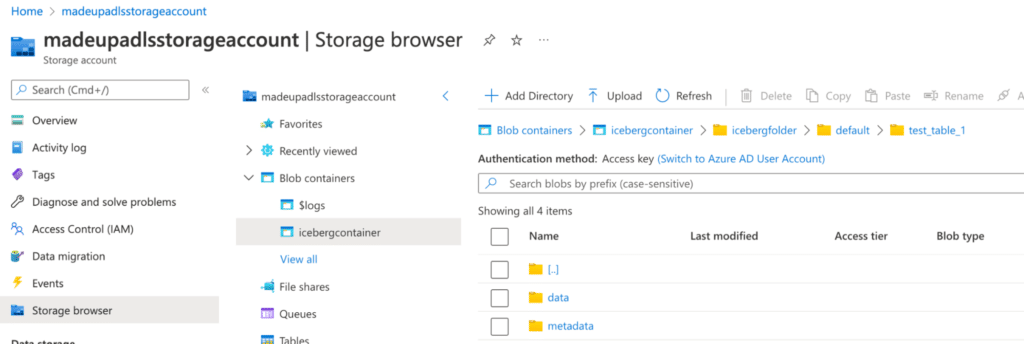
The Iceberg tables are now be written to and read from this location by Databricks, so if you execute the SQL from Step 4 again you can now see that the Iceberg table created in ADLS:
You can also work with this table in other tools like Dremio to read, add, delete, or append data. The screenshot below illustrates access to the Apache Iceberg table from Dremio with a new record inserted.
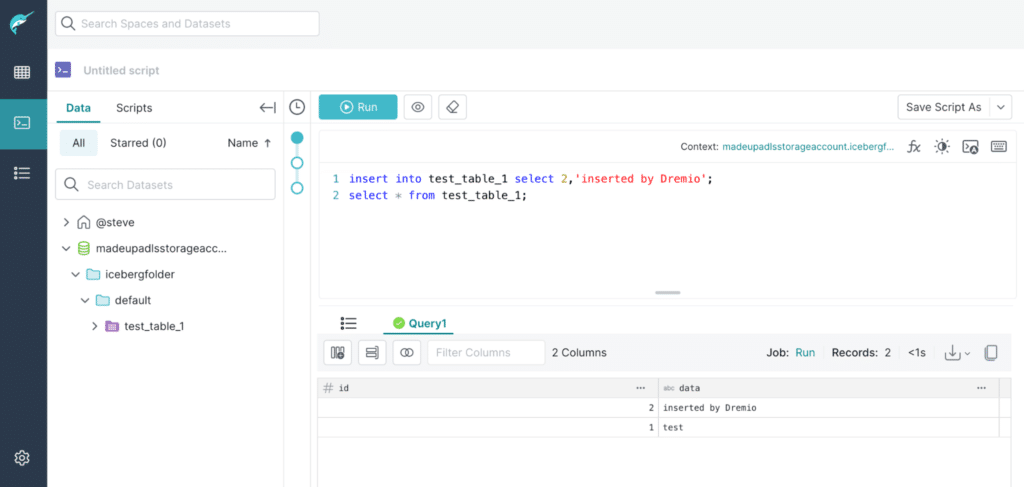
If you return to Databricks you can see that the record is also readable there:

Step 6: Configure Spark to Use a Hive Catalog
You now have the ability to read and write Iceberg tables with Databricks, as well as read and write those same Iceberg tables from any other Iceberg-compatible engine like Dremio. This allows you to use the best engine for the workload — e.g., Databricks Spark for ETL and Dremio for BI.
Another option is to use a metastore when creating your Iceberg tables. To do this you need to change spark.sql.catalog.spark_catalog.type to hive.
However, when you attempt to create a table you may get the following error:

Error in SQL statement: RuntimeMetaException: Failed to connect to Hive Metastore
By default, when you set spark.sql.catalog.spark_catalog.type to hive, Databricks Spark defaults that metastore to be the Databricks internal metastore, at the moment this doesn’t support Apache Iceberg.
Upon attaching your own Hive metastore, you can successfully work with it and Iceberg tables in Databricks. There are a few steps when it comes to configuring an external metastore which you can read about here.
Configuring your Databricks cluster to use an external metastore and storage is a good idea whether or not you are using the Apache Iceberg format, because it enables you to work with your data using best-of-breed tools and prevents your data from being locked into Databricks. It is worth noting that the only way to access your data in DBFS is by running a Databricks Compute cluster, along with its associated costs.
Conclusion
As you can see it is fairly straightforward to get started with Apache Iceberg in Databricks, although there are some restrictions around the use of the Databricks internal metastore which will hopefully be addressed over time.
Using Apache Iceberg in Databricks allows you to use the best engine for the workload (e.g., Databricks Spark for ETL and Dremio for BI), regardless of which vendor makes the engine you want to use.
